Jektify
Jektify is a Gem for entering track, playlist, albums and artists in Jekyll templates.
Lasted version 1.0.8

Jektify is a Gem for entering track, playlist, albums and artists in Jekyll templates.
Lasted version 1.0.8
Beautiful and Customizable, much more appealing than a simple “iframe”!
Jektify is a jewel using to enter a theme for track entry, playlist, albums and artists of Spotify, in Jekyll templates.
Besides inserting music is fully responsive, adjusting as your page layout, even on mobile devices.
You need to install, so let’s mission:
You can see the dependencies of gem Jektify through Gemnasium. All dependencies are listed.
With Jektify running, it uses dependency on JQuery.
Add Jektify to your Gemfile and run the command: bundle install:
group :jekyll_plugins do
  gem "jektify"
end
or run command:
gem install jektifyIf you use CSS Jekyll, insert this line in the manifest _sass/main.scss SASS of your project:
@use "jektify";Note: It is advisable to insert the end of all imports
If you do not use the SASS Jekyll, the Jektify also solves this constraint, keep reading Configuration file “_config.yml” and find out how to configure without needing to use the Jekyll SASS manager.
Now, you need to configure the file _config.yml your theme Jekyll.
The following lines should be inserted:
plugins:
  - jektify

jektify:
  enable: true
  open: true
  toggle:
    enable: true
  spotify:
    user: williamcanin
    text: See me no Spotify
  sass:
    jekyll: true
    other:
      dir: "way/to/your/SASS"
  title:
    enable: true
    text: "Jektify"
  description:
    enable: true
    text: |
      Jekyll plugin to generate html snippets for embedding Spotify Musics.
To listen to the full song, open your Spotify and start these musics.[ Line 2 ] Report for Jekyll use Jektify.
[ Line 5 ] - Option: [ true / false ] Enables or disables the plugin for all site.
[ Line 6 ] - Option: [ true / false ] In this line you define whether you want the “Jektify” let the music box in open or closed mode in page. Remember that if the “toggle => enable” option is set to false, any value in this option will have no implication.
If a different value of these two themes is inserted, the Jekyll Spotify Plugin will have operation error.
[ Line 8 ] - Option [ true / false ] This feature enables you to enable or disable the Toggle function of the Jektify. If it is set to true a button in the upper right corner will exist for an action to scroll and unroll the window. If the value is equal to false, the button will not exist, only open window will be created, this causes the javascript of Jektify not to be generated for the user, because the scrolling and unwinding depends on the script.
[ Line 10 ] - Option [ user Spotify ] Put your Spotify user on this line to create a redirect button in the Spotify online player. If name or text are empty, the Jektify will not render this option. So, if you do not want to use it, leave the values with nothing.
[ Line 11 ] - Option [ text ] Here is the custom text that the redirect button will have. Put a very attractive and short.
[ Line 13 ] Option [ true / false ] This line is very important! In it you will define using the build SASS Jekyll or other compilation of SASS, as the Gulp. If you use the Jekyll, let true. If you do not use SASS of Jekyll leaves to false.
[ Line 15 ] Option [ path ] If the line 13 is false, you should inform the way the vendor folder of your SASS files. For example: If you store your SASS files in the src/sass/vendor, then that is the way you have to put in the variable dir.
After setting the path and build the project, a folder will be created to export the SASS of Jektify, in the path of the dir . With this, you must load the exported SASS in your manifest (main.scss). For example:
@import "{way/to/your/SASS/vendor}/jektify/jektify"[ Line 17 and 20 ] - Option: [ true / false ] If you want a title or description, leave to true. Otherwise, leave as false.
[ Line 18 and 21 ] If the line 17 (or line 20) is in the true, enter your title (or description) in variable text. So if you want a title and content inside the music box…use true.
ATTENTION!Using Javascript in the Jektify will only be necessary if the Toggle feature is set totrueat line 8(eight) in “Configuration file _config.yml”. Before you begin, you must import the JQuery for your project.
After setting the _config.yml file and imported the SASS of Jektify, you must import the JavaScript Jektify for HTML. The Jektify copy the Javascript to the folder of the compiled site _site.
assets/vendor/jektify/js/jektify.min.js
Do import JavaScript in _layout/default.html at the end of </ body>, like this:
...
{ % if site.jektify.enable == true and site.jektify.toggle.enable == true % }
<script src="{ { "/assets/vendor/jektify/js/jektify.min.js" | prepend: site.baseurl } }" ></script>
{ % endif % }
</body>
Note 1: Do not leave space between{ {and} },{ %and% }
Note 2: Do not forget to load the script Jektify after JQuery.
You can use CDN of the respective version:
---

<script src="https://cdn.jsdelivr.net/gh/jektify/jektify-cdn/<VERSION>/js/jektify.min.js"></script>
</body>
You can see the CDNs of the other [VERSION] in:
Note: It is recommended to use the “
stable” version. In case of error, use the version according to Jektify. If you do not have the Jektify version on CDN, the “stable” version is also used.
If you want to use CDN for CSS, do this:
---
<link rel="stylesheet" href="https://cdn.jsdelivr.net/gh/jektify/jektify-cdn/<VERSION>/css/jektify.min.css">
</head>
You can see the CDNs of the other [VERSION] in:
Note: It is recommended to use the “
stable” version. In case of error, use the version according to Jektify. If you do not have the Jektify version on CDN, the “stable” version is also used.
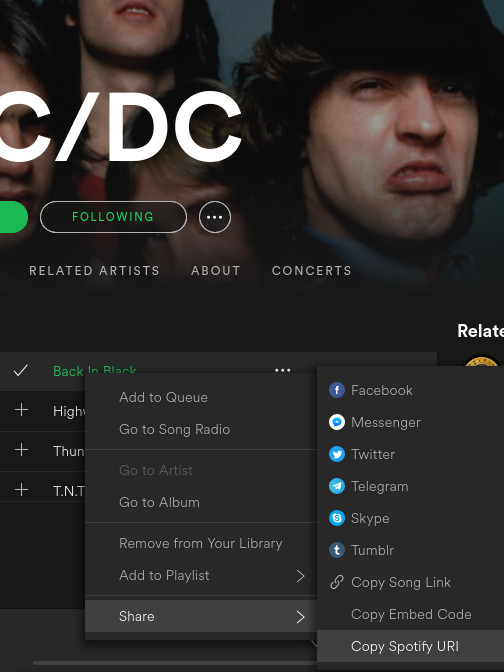
The Jektify capture songs, playlists and albums from artists in the Spotify, by URI code distributed by Spotify. You can do this by the Spotify application on your computer or through Spotify in the browser.
First you have to get the URL of the song, album, playlist, of artist you want. An easy way to know how to do this is in the Spotify of support documentation, here.
See an illustrative picture of how to capture the URI in Spotify Player:

It will open a dialog, when open click URI to copy.
What you will get looks like this:
spotify:track:08mG3Y1vljYA6bvDt4Wqkj
The Jektify will use this URI, the only difference being that instead of being : will be /. See below how it works.
The Jektify it works with the following tags:
{ % jektify spotify/[type]/[id]/[theme] % }Note: There can be no spaces between the keys. This here for the Jektify does not come into work.
Note that there are three (3) parameters, all separated by slash. Let us know what each one does:
[type] Option [ track / album / playlist / artist ]
[id] Option [ id ]
[theme] Option [ white / dark ]
Example:
{ % jektify spotify/track/62qsgMnY4wg8nE5qjyOdWO/dark % }

{ % jektify spotify/playlist/48brJJZdVifY79QAFmEImq/light % }

{ % jektify spotify/artist/711MCceyCBcFnzjGY4Q7Un/dark % }

{ % jektify spotify/album/6OwvO40ahugJE5PH4TjqTg/light % }
Note: Do not leave spaces between the keys.
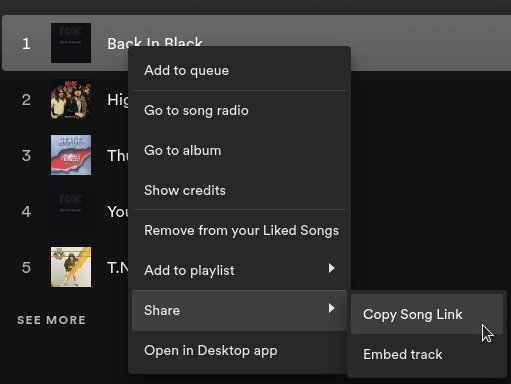
In this case you can use the Spotify Web. The method is a little different but not difficult. You will have to copy the link of the song, artist or playlist like this:

You have something like this:
https://open.spotify.com/track/08mG3Y1vljYA6bvDt4Wqkj?si=709400b764384c6bWhat we need in this link is just the following excerpt:
track/08mG3Y1vljYA6bvDt4WqkjThe category, which can be track, playlist, or artist, plus the ID. Formatting our URL to Jektify would look like this:
{ % jektify spotify/track/08mG3Y1vljYA6bvDt4Wqkj/dark % }Note: Do not leave spaces between the keys.
Jektify already has a suitable customization for sensitive layouts, but still leaves a case of personalization itself, the user chooses the themes at hand and the way it fits into your page template.
To customize to your liking, use the class .jektify in your stylesheets (SASS). Use your browser’s developer tool. E.g: Google Dev Tools, to know which classes to change.
The class structure .jektify this is:
NOTE: You should put CSS properties inside the subclass “–custom”.
.jektify{
  &--custom{ }
  &__header{
    &--custom{}
  }
  &__brand{
    &--custom{}
  }
  &__year{
    &--custom{}
  }
  &__button{
    &--custom{}
  }
  &__user{
    &--custom{}
    &-link{
      &--custom{}
    }
    &-text{
      &--custom{}
    }
  }
  &__body{
    &--custom{}
  }
  &__title{
    &--custom{}
  }
  &__description{
    &--custom{}
  }
  &__tracklist{
    &--custom{}
  }
  &__track{
    &--custom{}
  }
}Here is examples of how the “Jektify” will behave in your page:
You can take questions in GitHub Issues.
If you liked my work, buy me a coffee <3
The gem is available as open source under the terms of the MIT
Copyright (c) 2025 William Canin